
Something is wonderfully delectable about biting through a crunchy Beer Battered Fish Recipe crust. With its golden-brown exterior, great texture, and flavor, it is now a classic dish that many appreciate. If you have been missing that fab fish and chip shop experience, search no longer. The main aim of this article is to share a super crispy beer-battered fish recipe that you will enjoy, and your family/friends will be amazed by your cooking skills. Put on your apron, switch on the fryer, and make some proper fish and chips!
Choosing the Perfect Fish Fillets
Before diving into the batter-making process, selecting the right fish fillets is crucial. For beer-battered fish, you’ll want to choose a white fish with firm flesh that can withstand frying without falling apart. Cod, haddock, pollock, and halibut are excellent choices.
Opt for fresh or frozen fish fillets and ensure they are thawed if frozen ones are used. Pat them dry with paper towels to remove any excess moisture, which will help the batter adhere better.
Preparing the Batter
The secret to a fantastic beer batter lies in its simplicity. To prepare the batter, you’ll need a few basic ingredients: flour, baking powder, salt, and beer. The carbonation in the beer creates air pockets, resulting in that desirable light and crispy texture. Whisk together one cup of all-purpose flour, one teaspoon of baking powder, and half a teaspoon of salt in a mixing bowl.
Gradually whisk in one cup of cold beer until the batter is smooth and free of lumps. The batter should have a consistency similar to pancake batter, thick enough to coat the fish but not too heavy.
Getting the Oil Temperature Right
To achieve that perfect crunch, it’s essential to fry the fish at the right temperature. Heat the oil in a deep fryer or a large, heavy-bottomed pot until it reaches 375°F (190°C). Maintaining the correct oil temperature is crucial for crispiness. If the oil is too hot, the batter may brown quickly while leaving the fish undercooked inside.
On the other hand, if the oil is not hot enough, the fish may absorb excess oil, resulting in a greasy final product. A thermometer monitors the oil temperature throughout the frying process for consistent results.
Coating the Fish in Batter
Now that your batter is ready and the oil is hot, it’s time to coat the fish and transform it into a crispy delight. Dip one piece of fish at a time into the batter, ensuring it is fully coated. Allow any excess batter to drip off before carefully placing the coated fish into the hot oil. Repeat the process with the remaining fish fillets, ensuring that the fryer or pot is not overcrowded. Overcrowding can cause the temperature of the oil to drop, resulting in less crispy fish. For the best results, fry the fish in small batches, giving each piece ample space to cook evenly.
Frying the Fish to Golden Perfection
Lowering the battered fish into the hot oil will sizzle and bubble, and the transformation from raw fillet to crispy delight will begin. Let the fish fry for approximately 4-5 minutes or until it turns a beautiful golden brown color. The exact cooking time may vary depending on the thickness of the fillets. Use a slotted spoon or tongs to carefully flip the fish halfway through the cooking process, ensuring even browning on both sides. Keep a close eye on the fish as it fries, adjusting the heat if necessary to maintain the oil temperature.
Draining and Resting the Fish
Once your fish is perfectly crispy and golden, carefully remove it from the oil using a slotted spoon or tongs. Allow any excess oil to drain by placing the fish on a wire rack or a paper towel-lined plate. This step helps preserve the crispiness and prevents the fish from becoming greasy. Give the fish a few minutes to rest and cool slightly before serving. This brief resting period allows the flavors to settle and ensures a delightful eating experience.
Serving Your Crispy Beer-Battered Fish
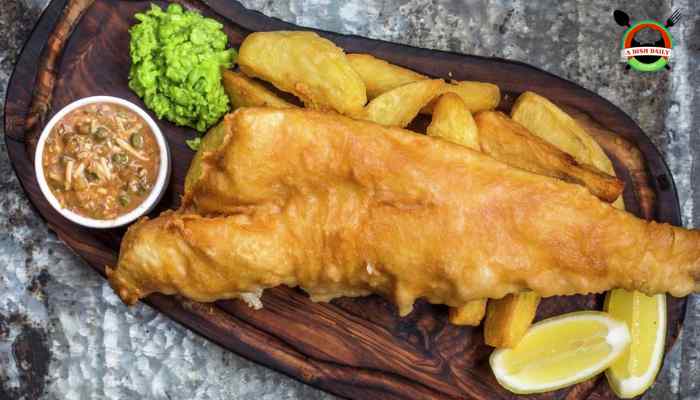
Now comes the moment you’ve been waiting for—serving your deliciously crispy beer-battered fish! Arrange the fish fillets on a platter or individual plates, and garnish with a sprinkle of sea salt and a squeeze of fresh lemon juice for a burst of brightness. For the authentic fish and chips experience, serve your crispy fish with a side of piping hot, crispy french fries. Don’t forget the classic accompaniment of tartar sauce, which you can easily make at home. Let’s whip up a quick batch!
Making Homemade Tartar Sauce
To make tartar sauce, combine half a cup of mayonnaise, two tablespoons of finely chopped dill pickles, one tablespoon of capers (optional), one tablespoon of finely chopped fresh parsley, and one teaspoon of freshly squeezed lemon juice. Mix everything together in a small bowl until well combined. Taste and adjust the seasoning by adding salt and pepper if desired. Serve the tartar sauce with your crispy beer-battered fish and enjoy the perfect pairing of flavors.
Tips and Tricks for the Best Results
- Use ice-cold beer for the batter to achieve maximum crispiness.
- For a unique twist, try using different types of beer, such as lagers or ales, to add depth of flavor to your batter.
- Ensure the fish fillets are dry before dipping them into the batter to promote better adhesion.
- To maintain the crispiness of the fish while frying in batches, place the cooked pieces on a wire rack instead of stacking them on top of each other.
- If you don’t have a deep fryer, you can use a heavy-bottomed pot with enough oil to submerge the fish fillets.
- Experiment with different spices and seasonings in the batter, such as paprika, garlic powder, or cayenne pepper, to add a kick of flavor.
- You can try air-frying the beer-battered fish if you prefer a lighter version. Preheat your air fryer to 400°F (200°C) and cook the fish for approximately 10-12 minutes, flipping halfway through.
- Remember to dispose of the used oil properly and safely once it has cooled down.
FAQs – Beer Battered Fish Recipe
A: Absolutely! While cod and haddock are traditional choices, you can experiment with other white fish like pollock, halibut, or tilapia. Just ensure the fish has a firm texture to withstand frying.
A: It’s best to prepare the batter before frying the fish. The carbonation in the beer contributes to the light and crispy texture, and it may dissipate if the batter sits for too long.
A: While it’s possible to freeze beer-battered fish, it’s worth noting that the crispiness may diminish slightly upon reheating. If you plan to freeze the fish, allow it to cool completely, then store it in an airtight container in the freezer for up to one month. Reheat in a preheated oven at 350°F (175°C) until warmed through and crispy.
A: Beer plays a significant role in creating beer-battered fish’s characteristic texture and flavor. The results may vary, but you can experiment with non-alcoholic beer or carbonated water.
A: It’s generally recommended not to reuse the frying oil for quality and safety reasons. The oil can become contaminated with flavors from previous frying sessions and may break down, affecting the taste and texture of the fish. It’s best to use fresh oil for each batch.
Now that you have the knowledge and the recipe, it’s time to embark on your crispy beer-battered fish adventure. Gather the ingredients, follow the steps, and get ready to savor the ultimate fish and chips experience in the comfort of your own home. So indulge in the satisfying crunch of perfectly fried fish, and let your taste buds rejoice!
Ameer Hamza Mughal is a content writer specializing in creating delicious and easy-to-follow recipes. He is passionate about sharing his culinary knowledge and helping others explore the joy of cooking. With a focus on clear instructions and mouthwatering descriptions, Ameer’s recipes are sure to inspire you to create delectable dishes in your own kitchen.